
We’ve often been asked, “Are there certain types of ultrasound probes that are more fragile than others?” or, “Are there certain probe types that are more prone to damage than others?” We can confidently say, “It’s a firm maybe.” A better way to frame the response would be to say, “There are certain probe types that pose greater challenges for proper care and handling than others.” For this post, let’s focus on standard probes, versus TEE. Standard probe types comprise about 80-90% of all probes in a facility. And, TEE probes have their own challenges when it comes to proper care and handling. Asked that same question, a better reply would be. “No matter the make or model, endo-cavity probes pose some of the greatest challenges related to longevity, rates of failure, and severity of failure.
Most Common Mode of Failure
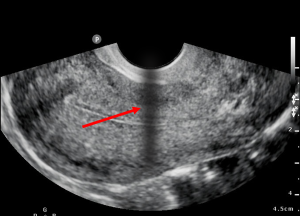
A common failure related to endo-cavity probes is image dropout in the center of the scan image. Image dropout is anything from a well-defined vertical line to a blurry, shadowy area of no information (hypo-echoic artifact) within the scan image. The root cause of most of these failures is traumatic damage to the acoustic array. The words traumatic damage typically evoke thoughts of cracks, fractures, crushes, or some type of physical damage. With endo-cavity probes, many times there are no outward signs of trauma whatsoever. None!
At one time, what is now referred to as the acoustic array, was called “the crystals”. Mainly because primitive array technologies used quartz for its piezoelectric qualities. Some sonographers still, to this day, refer to the array as such. Pause to think for a minute. Dropping a ceramic mug, glass, or similar item typically results in shattered glass all over the floor. Practically, the weight of an ultrasound scanhead is about that of a mug or glass.
Endo-Cavity Probe Array Design
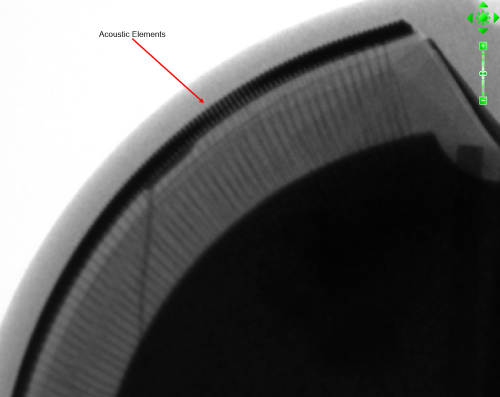
Inherent to their design, the arrays in endo-cavity probes are extremely thin, just about 0.5mm. They also have an extremely fine pitch. Meaning, that there may be up to 192 individual acoustic elements within a 1-inch space. Even though the array is covered by the rubber-like lens and encased within a plastic probe housing, many non-traumatic events over-time or just one accidental fall from a scanner could shatter the elements within the array. Although there may be no, or minimal, signs of external trauma, electronic and acoustic testing can confirm that impact(s) have catastrophically damaged the acoustic array.
This is analogous to a patient who complains of severe headaches. Physical examination may not reveal head trauma, but a CT or MRI can confirm that a concussion has occurred. Due to the top-heavy nature of endo-cavity probes, when they fall, most times the impact is to the top of the probe or the array.
Best Practices for Storage
Endo-cavity probes pose storage challenges. Even though user manuals may not provide specific guidance for endo-cavity probes, there are some best practices that can be employed by end-users to reduce the occurrences of accidental trauma.
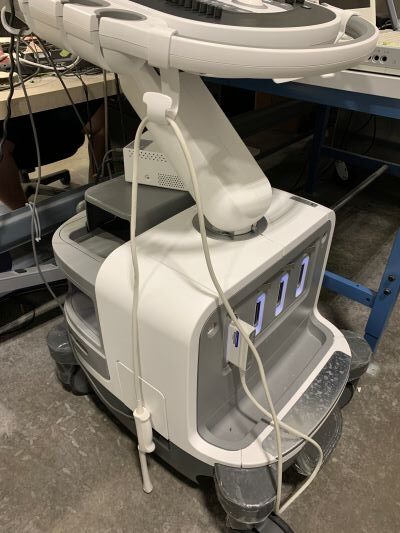
- Endo-cavity probes should NOT BE STORED on-board the scanner using the standard probe holders unless the holder is specifically designed for that purpose. Some GE scanners do have an excellent on-board storage solution for endo-cavity probes.
- If an endo-cavity probes is placed within a standard probe holder, it SHOULD NEVER be left unattended.
- When not required for IMMEDIATE use, endo-cavity probes should be stored on a flat surface, such as a countertop, within a storage bin, or within a drawer.
It’s standard practice to rinse endo-cavity probes post-use and prior to being high-level disinfected. If consistent, careful and meticulous, handling is not employed during the cleaning process, catastrophic array damage is possible. Accidental drops to the counter or to the rinse sink, or minor impacts to hard surfaces, such as countertops can, over-time, shatter the delicate array elements.
Most Frequent Failures
Another common failure with endo-cavity probes is catastrophic electronic failures due to gross fluid invasion. The probe housings of endo-cavity probes are usually a multi-piece design. The adhesives and sealants that join the various sections of the housings can wear and degrade over-time through:
- Repeated disinfection cycles
- Accidental trauma
- Use of incorrect chemicals, or even
- Due to repairs that have been performed using materials and adhesives that have not been validated.
Tiny voids, cracks, or openings in the probe housing or acoustic lens can allow gel, water, or disinfecting solution to enter the probe. This can lead to a risk of catastrophic array damage, electronic failures, electrical shock, and cross-contamination. User manuals typically recommend that sonographers inspect every probe prior to every use, but they don’t usually provide specific guidance for endo-cavity probes.
Best Practices During the Cleaning Process
- At a minimum, sonographers should examine endo-cavity probes daily
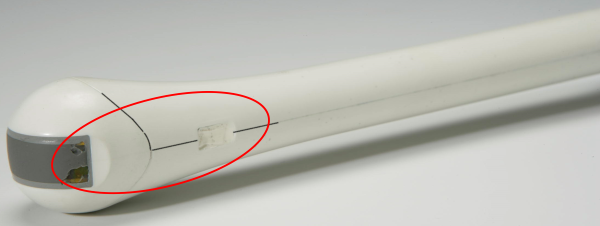
- Sonographers should examine each seam and joint on the probe housings. They should inspect for small voids, cracks, or openings that might allow entry of gel, water, or disinfecting solution. The probe housing sections can be very-gently wiggled while observing the joints or seams so you can visualize deficiencies more-easily.
- The acoustic lens should be examined for perforations or imperfections where gel, water, or disinfecting solution would be able to gain entry
- Users should always error on the side of caution. If an opening or void is identified, you should immediately remove the probe from service. DO NOT proceed with the normal disinfection process via immersion or vapor chamber (like Trophon). Disinfect using an approved low or intermediate-level disinfectant wipe. Do not return the probe to clinical service until it is repaired or replaced.
Endo-cavity probes pose some of the greatest challenges related to longevity. Ben Franklin said, “An ounce of prevention is worth a pound of cure.” It was true over 200 years ago and it is still true today.
Innovatus Imaging is committed to assisting customers with implementing best practices. The goal is to ensure maximum longevity with their imaging devices to complement our sustainable repairs. Kindly allow us to assist you and your customers by contacting TedL@innovatusimaging.com