
If you don’t schedule time for preventive maintenance, your device will schedule it for you…and usually at the most inopportune time. A simple web search on the term preventive maintenance (PM) results in 171 million results in 0.5 seconds but its definition and how its practice is implemented differs based on many criteria. There are early warning signs related to your ultrasound probes that may indicate that NOW is the time for a repair.
Let’s define preventive maintenance as routine, scheduled activities designed to minimize unplanned downtime and expensive costs associated with unanticipated failures.
Preventive maintenance on ultrasound systems can vary greatly depending on who is performing the PM and the type of PM program established (Traditional or Alternative Equipment Maintenance Plan). What’s performed as part of the PM can differ greatly as well, and some facilities have generalized PMs across all makes/models of scanners.

According to several GE service manuals, air filter cleaning and cleaning of the scanner is the responsibility of end-users and should occur monthly, and probes are to be visually inspected prior to each use.
For those that have supported this modality, we know that these tasks typically don’t occur, at least by the sonographers.
Let’s examine a traditional OEM-level PM on an ultrasound scanner.
Depending upon the OEM and contractual obligations, preventive maintenance may only be performed once every year.
- The system is cleaned
- Visually inspected
- Damaged mechanical parts are replaced
- Diagnostics are run
- General image quality checks are performed as well as electrical safety
- If probes are damaged, or their safety or function is in question, they are replaced
Most facilities categorize ultrasound probes as accessory devices, when they are in fact separate Class 2 medical devices. The definition of and average cost of acquiring or replacing a single ultrasound probe meets most criteria for capital equipment. Yet seldom are ultrasound probes assigned an asset tag or included in a PM program. They’re usually just associated with the scanner and included as part of its PM.
Some things to consider…Probes often migrate between scanners or scan rooms as needed. A reality is that a good portion of your facility’s probes may seldom or NOT be visualized as part of the PM of a scanner.
Did you know that probes are some of the highest failure items associated with diagnostic ultrasound, and that they are one of the largest contributors of service spend? It’s true. Why?
- Most sonographers do not perform daily or even frequent visual inspections to their probes
- Sonographers may also never have been informed on what to inspect
- Ultrasound probes may not be inventoried
- Ultrasound probes may not be included in a formal PM program
- Ultrasound probes may be missed when inspecting the scanner to which they may be associated
- Finally, the main reason that ultrasound probes are the most expensive part of supporting ultrasound is that many users wait until there is a significant image quality or performance problem before arranging for service.
Just like a car, a probe will exhibit certain characteristics prior to a major failure. Early Warning Signs
Our cars are equipped with all types of sensors that provide early warning signs to help us avoid catastrophic failures. Believe it or not, ultrasound probes provide early warning signs as well. They’re just not as obvious as a blinking red light on our dashboard.

- Your car’s brakes may begin to chirp when the brake pads are significantly worn
- The tire treads have wear indicators that inform when they should be replaced
- There is an indicator that your tire pressure is low
- The check engine light illuminates when there is a problem with the emissions system
After repairing well over 195,000 probes as well as being an FDA registered manufacturer of ultrasound probes, our teams understand the points of wear on probes and the signs that indicate a larger failure may be imminent. For instance,
Continued long-term exposure to harsh chemicals used for cleaning and disinfection WILL
- Lead to degradation of the seal that surrounds the acoustic lens
- Deteriorate the adhesive bonds that join the various sections of the probe housings and cause them to begin to separate, and
- Affect the flexibility of the strain relief and the cable sheathing
Yes, even chemicals approved for use on these devices WILL affect long-term performance
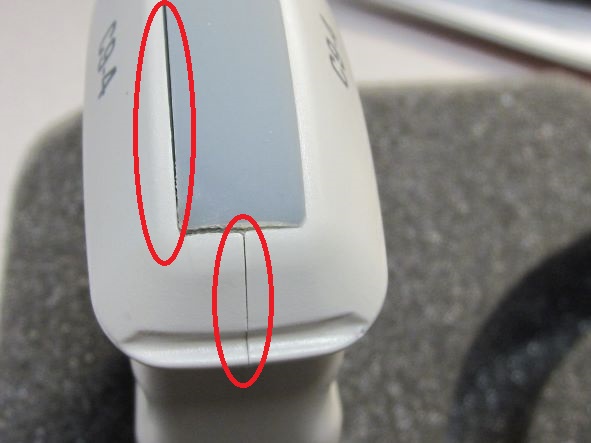

The use of improper chemicals or approved chemicals used improperly WILL accelerate the wear. For instance, once the seams and seals deteriorate, the probe is open to external contaminants such as gels, bio-burden, and chemical disinfectants. Biological contaminants allow for potential cross-contamination and chemicals and gels can rapidly corrode the internal electronics. The strain relief is designed to protect your probe’s cable jacket and internal wiring from wear as a result of hundreds of thousands of repeated flexes. Once your strain relief begins to separate, begins to stiffen, or begins to deteriorate, its protective features are diminished.
The cost to address seams, seals, and strain reliefs typically only costs as little as a few hundred dollars. The cost to restore image quality and functional efficacy can cost thousands and may not even be possible on some probe models. Don’t these symptoms seem to speak to preventive maintenance?
Based on over 15 years of data, anywhere from 20-45% of all probes currently in-use, right now, require some level of maintenance. Look for the Early Warning Signs
So where do you begin?
- Start by inventorying your probes and adding them to a PM schedule.
- Periodically inspect each probe for open seals, separated seams, and damaged strain reliefs.
- Better yet, partner with your sonographers. Attend one of their department meetings. Discuss the realities and costs associated with probe failures, teach them what to look for, and encourage them to inform you of any concerns.
- Innovatus Imaging publishes a visual inspection guide that can be used educationally. It’s a great idea to post one in each exam room to keep the concept top-of-mind. The guide can be downloaded from the resources section of our website and printed, or we can send high quality hard copies to your facility. Our team is also available to hold vir

If you don’t schedule time for preventive maintenance, your device will schedule it for you…and usually at the most inopportune time.